
GitLab 配置 Let’s Encrypt 颁发的 SSL免费证书
参考:
https://certbot.eff.org/docs/ h
安装 Let’s Encrypt 客户端
root@iZbp1gzimbaykc3ahbss48Z:~# git clone https://github.com/certbot/certbot申请ssl证书
root@iZbp1gzimbaykc3ahbss48Z:~# cd certbot/
 root@iZbp1gzimbaykc3ahbss48Z:~/certbot# ./certbot-auto --agree-tos --email ops@test.com
example.com certonly --webroot -w /opt/gitlab/embedded/service/gitlab-rails/public/ -d git.example.comcertonly只申请证书
--agree-tos同意用户协议
webroot插件通过为中的每个您请求的域创建一个临时文件来工作${webroot-path}/.well-known/acme-challenge。然后,让我们加密验证服务器发出HTTP请求,以验证每个请求域的DNS都解析为运行certbot的服务器。向您的Web服务器发出的示例请求如下所示:
66.133.109.36 - - [05/Jan/2016:20:11:24 -0500] "GET /.well-known/acme-challenge/HGr8U1IeTW4kY_Z6UIyaakzOkyQgPr_7ArlLgtZE8SX HTTP/1.1" 200 87 "-" "Mozilla/5.0 (compatible; Let's Encrypt validation server; +https://www.letsencrypt.org)" GitLab 的默认的 nginx 服务器的根目录位于 /opt/gitlab/embedded/service/gitlab-rails/public/。-d指定要申请证书的域名。
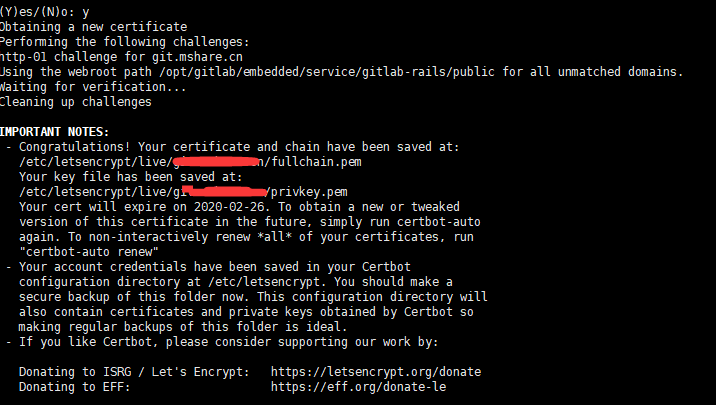
证书申请完成配置gitlab开启https
创建软连接
ln -s /etc/letsencrypt/live/git.mshare.cn/fullchain.pem  /etc/gitlab/ssl/example.pem
ln -s /etc/letsencrypt/live/git.mshare.cn/privkey.pem  /etc/gitlab/ssl/example_com.key
vim /etc/gitlab/gitlab.rb
---
external_url 'https://git.example.com'
nginx['redirect_http_to_https'] = true
nginx['ssl_certificate'] = "/etc/gitlab/ssl/example.pem"
nginx['ssl_certificate_key'] = "/etc/gitlab/ssl/example_com.key"
更新配置 重启
gitlab-ctl reconfigure
gitlab-ctl restart
自动证书更新
sudo crontab -e
0 3 * * 1 /root/certbot/certbot-auto renew && gitlab-ctl hup nginx

binzhou75
2020年6月4日 上午11:14
我用这个方法,但是验证失败,报错: http://mywebsite.com/.well-known/acme-challenge/pHC5pEq9WFmNkXMv9lYSx2VtrjG3YsGeq23IcqDisEU:
Timeout after connect